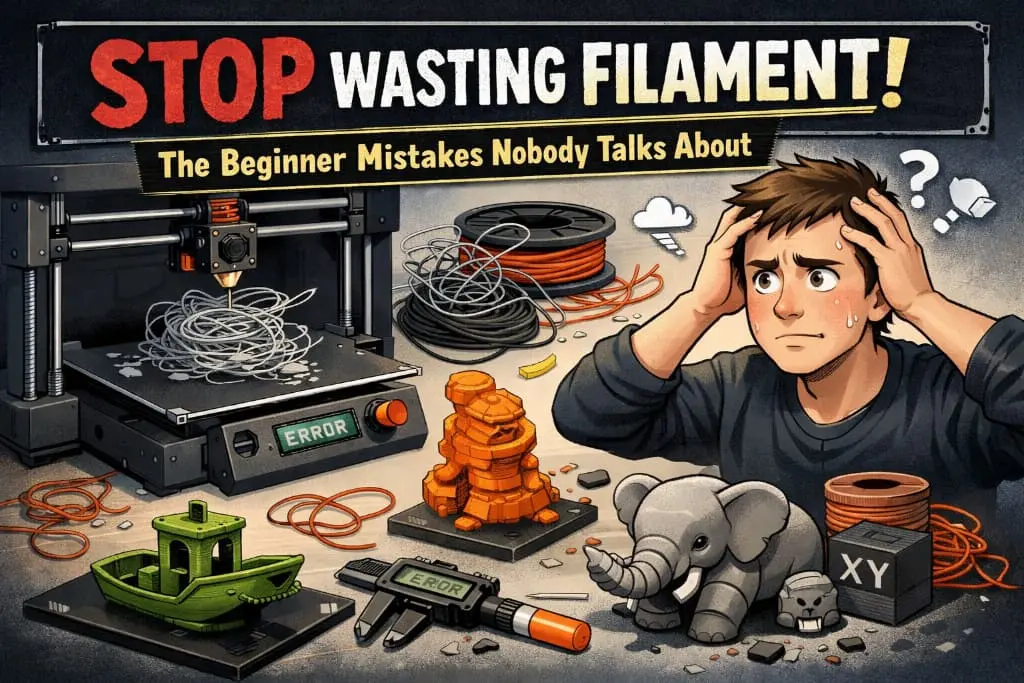
You’ve unboxed your first 3D printer. You’ve loaded your first spool of filament. You hit print — and watched in horror as your beautiful model turned into a tangled, stringy, half-melted disaster.
Sound familiar?
Here’s the uncomfortable truth: most beginner guides tell you what to do, but almost nobody tells you what not to do. And those silent mistakes? They’re quietly eating through your filament spool — and your budget — one failed print at a time.
Let’s fix that. Here are the filament-wasting beginner mistakes that nobody talks about, and exactly how to stop making them.
1. Printing Without Checking the Bed Level First (Every. Single. Time.)
This is the number one silent filament killer. You level your bed once, feel confident, and then print 12 more times without checking it again. By print number four, your first layer is either scraping into the bed or floating in mid-air — neither of which ends well.
Why it wastes filament: A bad first layer almost always means a failed print. That’s hours of filament gone for nothing.
The fix: Make bed leveling a ritual, not a one-time task. Even if your printer has auto-leveling (like a BLTouch), do a quick manual check every few sessions. Beds shift. Temperatures change. Vibrations happen. Two minutes of leveling saves two hours of failed prints.
2. Ignoring Slicer Supports (Or Using Way Too Many)
Supports are one of the most misunderstood settings in 3D printing. Beginners either skip them entirely and watch their overhangs collapse, or they crank support density to 100% and spend 40 minutes removing a concrete block of support material from their model.
Why it wastes filament: Over-engineered supports can use more filament than the actual model. Under-engineered supports mean reprinting from scratch.
The fix: Use tree supports in Cura or PrusaSlicer for organic models — they touch less of your print and use dramatically less filament. For flat-bottomed models, standard supports at 10–15% density are usually more than enough. And always preview your supports in the slicer before you hit print.
3. Storing Filament Like It’s Invincible
Here’s a mistake that will quietly ruin your prints and your wallet: leaving filament out in the open air for weeks. Filament — especially PLA, PETG, and Nylon — is hygroscopic, which means it absorbs moisture from the air like a sponge.
Wet filament bubbles, pops, and produces brittle, rough-surfaced prints. It also clogs your nozzle faster, which leads to — you guessed it — more failed prints and more wasted filament.
The fix: Store your filament in airtight containers with silica gel desiccant packets. You can buy dedicated filament dry boxes for under $20, or repurpose large airtight food storage containers. If your filament has already absorbed moisture, dry it in your oven at 45–50°C (for PLA) for 4–6 hours before printing.
4. Skipping the Test Print (And Going Straight to the Big Model)
We’ve all done it. You find an incredible 8-hour model, you’re excited, you hit print immediately — and two hours in, something goes wrong. The whole thing fails. Eight hours of print time and a full spool’s worth of filament: gone.
The fix: Always print a small calibration cube or a scaled-down version of your model first. Five minutes of test printing can save hours of failed full-scale prints. It’s not glamorous, but it’s the single fastest way to identify problems before they become expensive.
5. Using the Wrong Temperature for Your Filament Brand
Not all PLA is created equal. The “recommended” temperature on your slicer is a baseline, not gospel. Different brands — even different color variants from the same brand — can behave wildly differently at the same temperature.
Printing too hot causes stringing, oozing, and drooping details. Too cold and your layers won’t bond properly, leading to weak, brittle prints that snap apart in your hands.
The fix: Run a temperature tower test print. It’s a small, quick print that tests multiple temperatures in one go. It takes about 20 minutes and costs almost no filament — but it tells you exactly what temperature works best for that specific spool.
6. Never Cleaning the Nozzle
Your nozzle is doing heroic work every single print. Carbonized filament builds up inside it over time, causing partial clogs, inconsistent extrusion, and under-extruded sections that ruin your print quality.
The fix: Do a cold pull (also called an atomic pull) regularly. Heat your nozzle to printing temperature, push filament through manually, then let it cool to around 90°C and pull the filament out sharply. You’ll often pull out a disgusting black plug of burned material — and your next print will look dramatically better.
Final Thought: Small Habits, Big Savings
3D printing has a steep learning curve, but most filament waste comes from small, fixable habits — not catastrophic failures. Level your bed. Store your filament properly. Run a test print. Check your temperatures. Clean your nozzle.
Do these consistently, and you’ll spend less time watching failed prints — and more time making the stuff you actually set out to create.
Now go make something awesome. (And maybe put that filament in a sealed box first.)
FAQ’s
Q1. Why is my filament producing rough, bubbly prints?
Your filament has absorbed moisture. Store it in an airtight container with silica gel and dry it at 45–50°C for 4–6 hours before printing.
Q2. How often should I level my 3D printer bed?
Check bed level every few print sessions. Beds shift over time — two minutes of leveling saves hours of failed prints.
Q3. How do I reduce filament waste from supports?
Use tree supports in Cura or PrusaSlicer at 10–15% density. They use less filament and are far easier to remove.
Q4. What temperature should I print my filament at?
It varies by brand and color. Run a temperature tower test to find the sweet spot — too hot causes stringing, too cold causes weak layers.
Q5. How do I know if my nozzle is clogged?
Look for thin lines or gaps in your print. Do a cold pull at 90°C to clear built-up debris and restore clean extrusion.