You finally set up your 3D printer, spent time finding the perfect model online, hit print — and wake up to a tangled mess of plastic or a half-finished blob stuck to the bed. Sound familiar?
You are not alone. Print failures are something every maker goes through, beginner or not. The good news is that most failures come down to a handful of common problems — and once you know what to look for, they are surprisingly easy to fix.
Let’s break it down.
1. The First Layer Is Everything
If your print fails, there is a good chance it started at the very first layer. That first layer is the foundation of your entire print. If it does not stick properly, nothing that comes after it will matter.
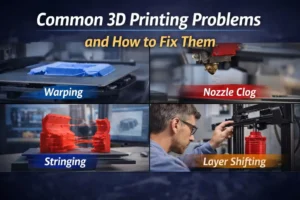
What goes wrong: The nozzle is either too far from the bed or too close. Too far, and the filament does not bond to the surface. Too close, and it gets scraped off or squishes unevenly.
How to fix it: Level your bed carefully. Most printers have manual knobs or automatic bed leveling — use them every few prints, not just once. A good first layer should look slightly squished and smooth, not round and stringy.
Also check your build surface. A clean, lightly textured surface (like PEI or glass with a thin glue stick layer) gives your filament something to grip onto.
2. Wrong Temperature for Your Filament
Not all filaments are the same, and printing them at the wrong temperature is one of the most overlooked causes of failure.
What goes wrong: If the temperature is too low, the filament does not melt properly, leading to weak layer bonding, gaps, or the extruder clicking and grinding. Too high, and you get oozing, stringing, or burnt material.
How to fix it: Always check the recommended temperature range printed on your filament spool. As a general starting point:
- PLA — 190°C to 220°C
- PETG — 230°C to 250°C
- ABS — 220°C to 260°C
Print a temperature tower — a simple test print that goes through multiple temperatures in one run — to find the sweet spot for your specific filament brand. Even two brands of PLA can behave differently.
3D Printing Speeds That Are Too Fast
Speed matters more than most beginners think. Cranking up the print speed feels like a win until your print starts showing gaps, shifted layers, or a wobbly structure.
What goes wrong: When the printer moves faster than the hotend can melt and push filament, you get under-extrusion. The layers do not bond properly and the print becomes fragile or incomplete.
How to fix it: Slow down, especially for the first layer. A good starting print speed is around 40–50 mm/s for most 3D printing setups. Once you understand how your machine behaves, you can push it further. But speed without stability is just a faster way to fail.
4. Wet or Old Filament
Filament absorbs moisture from the air. It sounds minor, but it makes a huge difference in print quality.
What goes wrong: Wet filament pops, hisses, or bubbles as it prints. You will notice rough surfaces, poor layer adhesion, and a lot of stringing. PETG and Nylon are especially sensitive to moisture, but even PLA can suffer after sitting in a humid room for weeks.
How to fix it: Store your filaments in sealed containers with desiccant packets. If you suspect your spool is already wet, dry it in a filament dryer or a low-temperature oven (around 45–65°C depending on the material) for a few hours before printing.
5. Poor Support Settings
Overhangs and bridges are tricky. Without proper supports, parts of your print that hang in the air will droop, collapse, or fail entirely.
What goes wrong: Either there are no supports where they are needed, or there are so many that removing them damages the surface.
How to fix it: Use your slicer’s overhang detection and set support angle threshold to around 45–50 degrees. Experiment with support interface layers for a cleaner separation. Tree supports work great for organic shapes and touch the model in fewer places.
6. Clogged Nozzle
A partial or full clog is a silent killer of prints. Your printer will act like it is working, but little to no filament will actually come out.
What goes wrong: Burnt filament, debris, or switching between materials without a proper purge can all cause clogs.
How to fix it: Try a cold pull first — heat the nozzle, push filament through, let it cool to around 90°C, then pull it out sharply. This often pulls the clog with it. If that does not work, a thin acupuncture needle or a dedicated nozzle cleaning kit can clear most blockages.
One Fix at a Time
Here is a tip that saves a lot of frustration: change only one thing at a time. When prints fail, it is tempting to adjust temperature, speed, and bed level all at once. But then you will never know what actually fixed it.
Test one variable, run a small print, evaluate the result, then move to the next. It takes more patience, but you will learn your machine faster and get consistent results.
Final Thoughts
Failed prints are not a sign that you are doing something wrong — they are part of the process. Every experienced maker has a box full of failed test prints somewhere. What separates them is that they learned from each one.
With the right approach to bed leveling, filament care, temperature tuning, and speed settings, you will spend far less time troubleshooting and far more time actually printing things you are proud of.
Keep experimenting. The next print is always better.
Need Expert Help? We’ve Got You Covered.
At 3DReality, we have spent years working deep in the 3D printing industry — and we know exactly how frustrating those failed prints can be. Whether you are just starting out or looking to scale up your production, we are here to make the process smooth, fast, and reliable.
From prototyping to finished 3D products, our team brings the experience and precision your project deserves. We work with a wide range of materials and technologies to bring your ideas to life — exactly the way you imagined them.
Let’s build something real together. Reach out to 3DReality today and let’s turn your concept into a product.
FAQ’s
1. Why do my 3D prints fail midway?
Prints usually fail due to poor bed adhesion, incorrect temperature settings, or unstable printer calibration.
2. How can I fix poor bed adhesion in 3D printing?
Clean the print bed, level it properly, and use adhesives like glue stick or tape if needed.
3. What causes stringing in 3D prints?
Stringing happens بسبب high nozzle temperature or incorrect retraction settings.
4. Why are my prints shifting layers?
Layer shifting is often caused by loose belts, motor issues, or sudden interruptions during printing.
5. How do I improve overall print quality?
Use correct slicing settings, maintain your printer regularly, and choose good-quality filament.